 Overview
-
Category: Exterior
Difficulty:
Authors: soncjet & sprintcarnut19
Thanks to soncjet and sprintcarnut19 from CePA for this DIY on how to swap the front ends of a MK3 Jetta and a Golf/GTI.
At first glance this seems like a huge, somewhat scary, project, but the authors assure me that it’s really not that bad, especially if you have someone to help with the hood.
Once swapped, the cars are generally known by new names: Getta (or Ghetta), Jolf and JTI. 🙂
 Tools
Tools
 1) 3/8″ drive ratchet
2) 6″ extension (3/8″ drive)
3) 1/4″ drive ratchet
4) 3″ extension (1/4″ drive)
5) Thin flat-head screwdriver
6) Phillips-head screwdriver
7) 8mm deep socket (1/4″ drive)
8) 13mm socket (3/8″ drive)
These tools are only needed if changes to the headlight wiring are required:
 A) Lighter (or something to shrink the tubing)
B) Soldering iron
C) Wire cutter
D) Heat shrink tubing
E) Compression tape (or something to wrap the wires with)
F) Solder
 Parts
Parts
The parts you’ll need will vary based on which car you are swapping to and from. No matter which swap you are doing, you’ll need the corresponding donor car’s:
1) Hood
2) Grill
3) Headlights
4) Headlight wiring
 Instructions
 1) We’ll start by removing the hood. (It’s definitely good to have 2 people for this part!) Open the hood, and prop it up with the hood prop rod. At the driver’s side corner closest to windshield; pull apart the connection for the washer fluid line and leave it attached to the hood.
 2) Using the 13mm socket and ratchet, remove the 13mm nut from the hood-end of the driver’s-side ground strap. Then, slide the strap off the stud and let it hang down.
 3) Remove the 2 bolts on each side of the hood using the ratchet, extension and 13mm socket. Once off, carefully remove the hood and set it aside. Watch that the prop-rod doesn’t fall!
NOTE: Be extra careful when handling the hood because damaging the paintwork will be a costly mistake.

 4) On to the grill… There are four clips along the top edge of the grill, as shown in the picture. These may have Phillips-head screws securing them to the radiator support (99% of the time these screws are missing). If it does have them, use the Phillips-head screwdriver to remove them. Next, use the flat-head screwdriver to gently press down on the tabs along the top edge of the grill (see inset) while carefully pulling the top of grill outwards. NOTE: These tabs are EXTREMELY fragile; some may already be broken or missing.
Once you have the entire top loose, you can unhook the bottom clips by either using the flat-head screwdriver to gently pry them up from underneath, or you can try to reach down from the top to release them. Don’t forget about the clips under each light.
Once free, set the grill aside.
 5) Now to remove the driver’s side headlight. First, unplug the wiring from the back of the light assembly. If removing GTI dual chamber lights, note which plug is the high beam (innermost with the white/brown wire) and which is the low beam (outermost with the yellow/brown wire). Then, use the ratchet, extension and 8mm deep socket to remove the four (4) 8mm bolts holding the entire light assembly in place. When done, carefully pull the light out and set it aside.
 6) The procedure is slightly different on the passenger’s side. First you need to remove the 13mm bolt on the inside edge of the passenger-side headlight (On top of the radiator support, as shown in this pic). You need to remove this to make enough room to wiggle the passenger-side light out of its position. Then unplug the light and remove the four mounting screws just like in Step 5. To take the light out, you’ll need to carefully wiggle the light and twist it slightly to free it. There are small nipples on 2 of the tabs that need to pop out of their places, then it should come right out.
Now you’re done with the disassembly/removal procedure. It’s time to start reinstalling everything!
7) To install the hood, you simply do the reverse of Steps 3, 2 and 1. When done, gently close the hood and check the clearance at the fender edges, then adjust the position of the hood on the hood hinges as required to line everything up at the front edge of the fenders. The goal is to have the same gap between the fender and the hood on both sides. Once adjusted, open the hood and prop it up with the prop rod.
8) To install the headlights, you need to do the reverse of Steps 6 and 5. If you are swapping the lights between a Golf and a Jetta, the factory wiring should plug right in. However, if you are installing the GTI’s ‘dual chamber’ lights in a plain Golf or Jetta, you will need to do some wiring.
There are a couple of ways to go about doing this wiring change. If you have access to a complete working parts car or are doing the swap with a friend (and have lots of time), you can swap the front lighting harness out completely. This requires that you unplug the side markers, fog lights, horn, etc. from both cars and then swap the harness. If time is short, or if you can’t locate a complete donor harness you can easily get away with splicing in just the ends that connect to the lights.
Here’s a mini-DIY to explain this procedure.
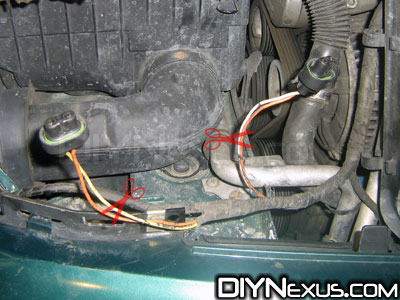
 8a) You’ll need to cut off the pigtail ends of both cars headlight wires, as shown in the pictures.
Leave at least 3″ of wire connected to the plug ends.
8b) Whether you are going from Jetta to GTI lights, or GTI to Jetta lights, you’ll need to solder (and heat shrink) the yellow wire on the pigtail to the yellow wire of the body harness.
8c) Next, you’ll need to solder (and heat shrink) the white wire from the pigtail and from the body harness.
 8d) If doing Jetta lights on a GTI, you will need to splice the 2 ground wires from the body harness into the 1 ground wire from the end of the Jetta light pigtail. (see note below) Here’s a diagram of the correct wiring.
 8e) If doing GTI lights on a Jetta, you will need to splice the 1 ground wire from the body harness to both of the ground wires from the ends of the GTI light pigtails. (see note below) Here’s a diagram of the correct wiring for this application.
NOTE: In either case, you will most likely need to lengthen the ground wires so that everything fits nice and neat. The author suggests that you extend the ground wires with an approx. 4″ long piece of wire. Solder (and heat shrink) the connections when you’ve got everything to the correct length.
8f) Wrap all exposed wires with the compression tape.
8g) Plug your new light harnesses into the headlights and test the high and low beams to make sure that all four work (left and right, high and low)
9) Finally, we get to install the grill. Starting with the bottom, center the grill from left to right and push the tabs into the slots. Follow up by doing the same with the top tabs. If you removed Phillips-head screws in Step 4, reinstall them now.
 Congrats, you’re done! You can close the hood, stand back, and enjoy your new ‘Getta’, ‘Jolf’ or ‘JTI’.

 Comments
Please post any questions, comments or suggestions under this page’s notification post on Facebook
Did you enjoy this post? Learn how you can support our blog, without spending a dime!