 Overview
Thanks to VgRt6 from the ‘tex for this DIY that explains how to replace the trunk microswitch on a MK4 Jetta.
-
Category: Electrical
Difficulty:
Original Author: VgRt6
These microswitches commonly fail, causing the trunk light to operate intermittently, or not at all. It would be wise to check that the bulb is good before performing this procedure. Also, it causes the ‘trunk open’ light on the instrument cluster to not work. The procedure was based on a 99.5 Jetta GLS VR6 – it may be slightly different on later-model cars (which have the emergency release inside the trunk). It’s a pretty simple procedure that should take approximately 30 minutes once you have all the tools and parts ready.
 Tools
Tools
 Here’s a list of recommended tools to complete this job:
1) 3/8″ drive ratchet
2) Phillips-head screwdriver
3) 3/8″ drive 10mm socket
 Parts
Parts
 Here is the part needed for this project:
1) The microswitch is VW part number: ‘8D5 959 489’
(Supposedly there is also a trunk microswitch with the part number ‘8D5 959 489 B’ which may be used on later-model cars. Double check your part numbers before ordering.)
 Instructions
 1) First, we need to open the trunk lid and remove the carpet lining. Using the Phillips-head screwdriver, loosen the 13 screws indicated by the red circles in the picture.
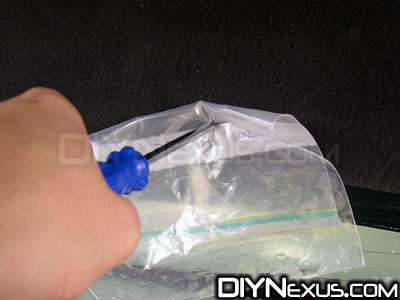
NOTE: The screws are coated with carpet fibers, so using a bare screwdriver may scratch off the coating. The author used a Ziploc Freezer bag, folded in half, to prevent this from happening, as shown in the next picture. It did a pretty good job of keeping the screw’s coating intact.
When done, carefully pull the carpet panel off and set it aside.

 2) Disconnect the actuator rod from the latch assembly by unsnapping the rod connector and removing the rod.
 3) Using the ratchet and 10mm socket, remove the two 10mm nuts to disconnect the latch assembly from the trunk lid. (It will still be connected to the switch wiring.)
 4) Lift the microswitch retaining flap on the underside of the trunk latch assembly off of the two white plastic pins. Then, flip it up.
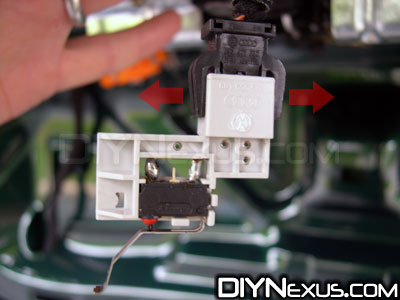
 5) Once the flap has been lifted, the microswitch should slide right out of the latch assembly. Disconnect the microswitch from its harness connector by pulling the two side tabs outward at the same time and then sliding it out.
NOTE: You can test to see if the microswitch is bad by jumping the two terminals in the harness connector with a small wire. If the trunk light comes on, then the microswitch is bad and needs to be replaced. If the light doesn’t come on:
• the bulb may be bad (you checked this first, right?) or
• there may be a problem with the wiring between the harness connector and the light.
Now you’re completely done with the disassembly procedure!
Replacing the switch is basically an “installation is reverse of removal” task.
 Comments
Please post any questions, comments or suggestions under this page’s notification post on Facebook
Did you enjoy this post? Learn how you can support our blog, without spending a dime!
