 Overview
This DIY will explain how to remove the headliner from a VW MK3 Jetta with a factory sunroof.
-
Category: Interior
Difficulty:
Author: DIYJus
It’s a pretty long process, but overall, it isn’t too hard. Try to keep your hands and fingers clean, because it’s really easy to get fingerprints on the headliner material, and that will just ruin your day!
Note: This procedure is also applicable to the Golf/GTI, with a few, small differences.
 Tools
Tools
 Here’s a list of recommended tools to complete this job:
1) Channel-lock pliers
2) Phillips-head screwdriver
3) Flat-head screwdriver
 Parts
Parts
No parts are needed for this project!
 Instructions
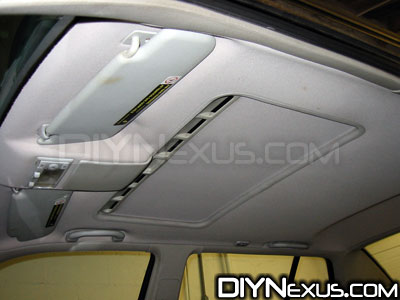 1) The first thing I would suggest is to clean out the interior of your car. By the end of this job you will have crawled in and out of the car from all the doors about 20 times each. Making sure there aren’t soda bottles, papers, etc… underfoot will really make it easier. Then, it’s time to have a look at the overall headliner to get yourself familiarized with the task at hand. This is a pic of our project car’s headliner before we started.
 2) We’ll start by pulling off both the driver’s and passenger’s sun visors. Remove the Phillips screws on each visor and clip.
 3) To get the visor out, you’ll need to pivot it down and towards the front of the car to disengage the clip.
 4) To remove the small visor holder, you just need to rotate it 90 degrees and it should pop right out.
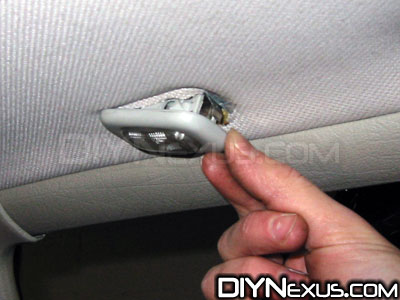
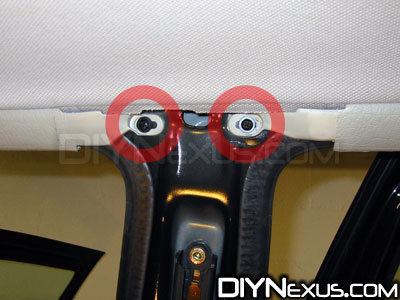
 5) Now we’ll move on to the sunroof switch/dome light assembly. From the passenger’s side, gently pry down with your fingers until it unclips. If yours is being stubborn, look at the pic to understand the mechanism. You may need to use the flat-head screwdriver to press the metal clip slightly. (ours came off easily)
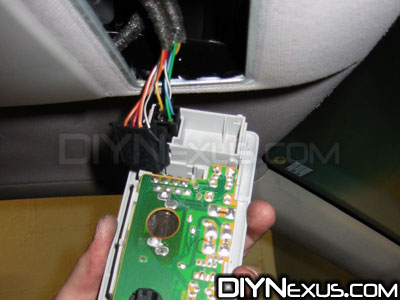 6) Once you have it out, disconnect the two electrical connections and set it aside.
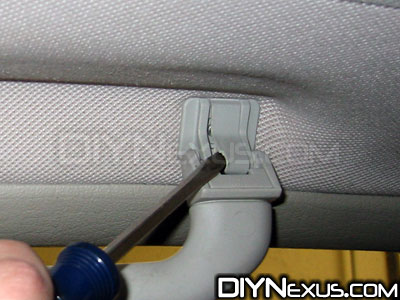 7) Next up are the grab handles or ‘Oh ****’ handles. 🙂 Pull the handle down and then use the flathead screwdriver to carefully pry the screw covers up on both screws of the handle. Be sure to only pry from the bottom, as they are hinged at the top.
 8) Once the screws are exposed, use the Phillips screwdriver to remove both screws and the handle. Repeat steps 7 and 8 for all three handles.
 9) In the back of the car, it’s time to remove the rear dome lights. These can be a bit tricky. Only one side of the light can be pulled down safely and that’s the side with the indentation for your finger. Use the same technique to get these out as you used in Step 5 on the front dome light housing. If they are giving you trouble, look at the pics to understand the mechanism and consider using the flat-head.
 10) Once out, disconnect the electrical connection and set the light aside. Repeat Steps 9 and 10 for the other rear dome light.
 11) Now we’re moving on to the plastic pillar trim. We need to start with the ‘B’ pillar. Using the flat-head screwdriver, go to the bottom of the ‘B’ pillar trim and pry the edge around the rubber gasket. Just work your way up the side to release it. Once you have most of that side released, go around to the other side and do the same thing.
 You should end up with a pillar that looks something like this:
 12) To remove it entirely, take some slack out of the seatbelt and “unhook” the top from the ‘A’ and ‘C’ pillars. Then pull down slightly to disengage it completely. If you have questions about how it all hooks up there, look at this pic to understand the clips. When done, just let the piece hang from the seatbelt. We don’t need to actually remove it completely from the car.
 13) With the ‘B’ pillar trim off, the two screws for the ‘A’ and ‘C’ pillar trim are exposed. Go ahead and remove them both with the Phillips screwdriver.
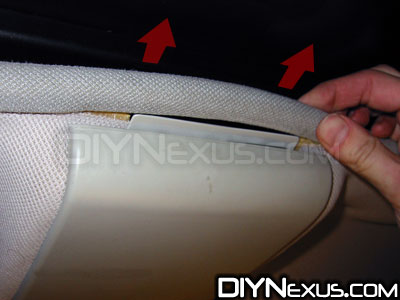
 14) Removing the ‘A’ and ‘C’ pillar plastic can be a bit tricky. They are held on by plastic ‘anchors’ that have little teeth that grab the edge of the metal. The best way I’ve found to get these out is to grab the plastic trim piece and pull while rocking back and forth. The rocking motion will allow some of the teeth to slip by on one side, then you rock to the other side letting them slip by, etc. There is a certain feel to it. Don’t be scared though. If you end up popping the clips off (which will happen a few times for sure), you can put them back on pretty easily. Here’s a pic of what happens when you pop the trim off of the clip.
 15) To get the clip out of the metal so that you can reattach it to the trim, carefully grab it with the channel-locks and pull it free. You don’t want to completely crush or deform this piece, so use as little force as necessary. Note the orientation of the clip as it is removed.
 16) Once the clip is removed, simply slide it back into the groove in the plastic trim. Make sure it’s in the same orientation that you noted in the last step.
 17) Okay, back to the ‘A’ pillar. If you haven’t washed your hands lately, now is a great time to do so! You’re most likely to get fingerprints on the headliner during this process. Starting from the end where you just removed the screw, begin pulling the trim down and away from the frame of the car. There are two things holding it up there: 1) Those clips we spoke about earlier and 2) The edge will hold around the rubber gasket just like the ‘B’ pillar. Work your way toward the front of the car freeing the plastic trim.
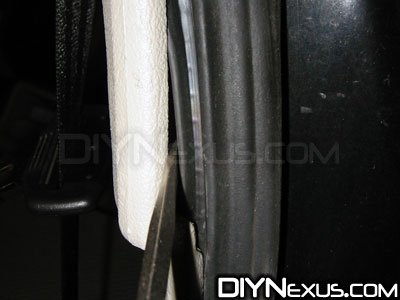
 18) As you get to the section near the windshield, the plastic will get a bit wider, but the process is the same. Just work all the way down to the base of the pillar where it meets the dash. Once you’re there, slide the pillar up and out as shown in the pic.
 19) Before we start to work on the ‘C’ pillar trim let’s move to the back and take out the rear trim piece. Start by taking off the 3rd brake light rear cover. To do this, you need to press the release tab on each side of the housing and then slide the back off.
 20) Once the rear cover is off, disconnect the electrical connection and set the cover aside.
 21) Now that the cover is off, there should be a decent amount of room to work for getting the rear trim piece out. Start by pulling the trim down and working it back and forth to unclip it across the entire back.
 22) Once you have it unclipped, you’ll have to bend it into a ‘bow’ shape to remove each end from where it meets the ‘C’ pillar. There are some hooks there that aren’t easy to take off the normal way. Bending it into a ‘bow’ makes this part easier. The plastic is pretty flexible so don’t be too scared, just go slow and exercise caution. If yours doesn’t want to come out this way, don’t break it. Look for another solution.
 23) With that back piece off, we can finally get the ‘C’ pillar trim loosened up. Start from where the screw was attached at the ‘B’ pillar and work at separating the trim from the car. Work towards the back near the rear window.
 24) To release the large section of ‘C’ pillar, you’ll want to grab the top of it from both sides and give it a swift tug. It’s held on by a couple of press-clips and should pop out pretty easily. You don’t need to completely remove this piece from the car. Just let it hang down from the headliner a couple of inches.
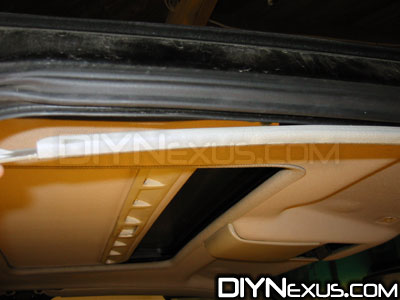
 25) Moving back up to the front, we need to remove the sunroof motor cover. Slide your sunroof shade panel to the back so that we have room to work and then grab the headliner “trim” near the sunroof motor cover. This trim is just held on with a ‘press-fit’ to the headliner and the metal support of the sunroof. Pull it towards the back of the car and off of the metal support as shown in the pic.
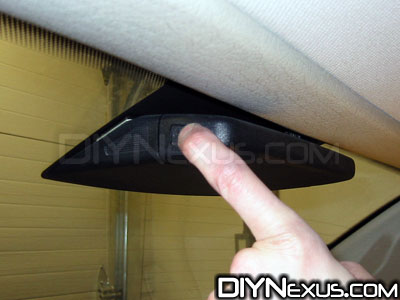
 26) Now you should be able to remove the motor cover pretty easily. It just slides to the back and then comes down. If you have any trouble, look at the pic to see the attachment clips.
 27) This is the last step before we actually take the headliner out of the car! When you’re done with this step, be prepared to support the headliner; it will only be held up by the loose ‘C’ pillar trim and mirror. It helps to have a 2nd person from this point on. Grab the sunroof trim molding and carefully pull it off of the entire circumference of the sunroof opening.

 28) Since the headliner is such a large piece, it’s a bit tricky to get it out of the car. I’ve found that it’s pretty easy if you take the passenger’s seat and push it all the way back. Then, recline the seat back as far as you can. Lastly, open the rear passenger’s door. (this is the door you’ll be taking it out of) Starting at the front, you’ll want to lower the headliner down past the mirror and then carefully pull the entire headliner forward to disengage it from the ‘C’ pillar trim. Just be slow and careful, and you shouldn’t have any problems. Once you’ve freed the entire headliner, let the passenger’s side drop down into the ‘gully’ created by moving the seat. Look at the pics to see what I mean. Once you’ve gotten it almost vertical, feed it out the door. Congrats!
 Comments
Please post any questions, comments or suggestions under this page’s notification post on Facebook
Did you enjoy this post? Learn how you can support our blog, without spending a dime!